There are several types of tie knots, including ways to tie the tie. The tie is the icing on the cake of outfits for various social events, weddings or balls.
Every man should learn the basics of how to tie a tie. Believe that with our instructions you can do it easily and quickly. So let’s take a look at how to tie a tie.

Table of Contents
Types of tie knots
- Single (narrow), Four in hand
- Windsor
- Half Windsor
- Double (Prince Albert knot)
- Eldredge
- Kent
How to tie a tie – step by step instructions
Tying will go better if you stand in front of a mirror and watch yourself. The mirror will also allow you to see how the finished piece appears when viewed from the front and you can easily correct any imperfections.
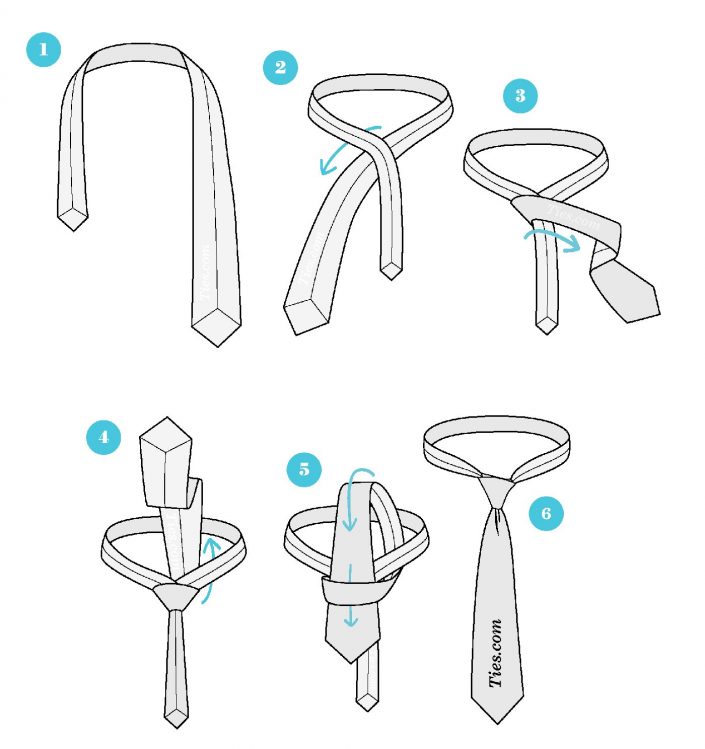
- Start by having the back of the tie pointing towards you, with the wide end on the right and the narrow end on the left. The tip of the small end should remain slightly above your belly (this will vary depending on your height and the thickness of the tie – must be tested). Move only the wide part of the tie.
- Place the wide end over the narrow part of the tie towards the left.
- Continue by wrapping the wide end of the tie around, towards the right.
- Next, thread it around between the neck and the tie and back towards the front.
- Thread it through the loop that has formed in the front.
- Before tightening the tie for the final time, we recommend matching it to the centre of the shirt, but also hiding the back of the tie under the collar (you may need help from your counterpart here) so that the tie doesn’t stick out unsightly at the back.
- Hold the knot with one hand, grasp the downward hanging end of the tie with the other hand, and tighten the knot in an opposing motion.
It probably won’t be perfect the first time, so don’t be afraid to repeat the tying several times until you get the desired result. If you’re stuck, ask someone more experienced to help you, or get your girlfriend or wife to help you.
A properly tied tie should have a dimple.
The right length of tie – how long should it be?
You should also keep an eye on the length of your tie. The end of the tie should touch the top of the belt buckle or reach the level of the buttonhole of your trousers.
Avoid unnecessarily long ties, but also very short ties, which often look very comical in combination with a bulging tummy.
Video instructions on YouTube – how to tie a tie
What is good to know about the small tie knot?
Small tie knots are usually tubular in shape. As the name reveals, the knots are smaller as they require less wrapping when knotting.
The small tie knot is suitable for tall men who do not have to worry about the tie not reaching the belt buckle after tying, as etiquette and custom prescribe. It suits shirts with narrow collars. This category includes the Kent, Four in Hand or Windsor Half tie knot.
The procedure for tying a tie varies from one type to another.
What is good to know about a large tie knot?
Large tie knots are suitable for shirts with Italian (hence wide) collars. A larger knot size is achieved by wrapping the knot a second or third time.
It is for this reason that sufficient tie length is important for this type of knot. Types of large tie knots are, for example, the Windsor Full or the Prince Albert knot. However, the Windsor Full knot is one of the most common and symmetrical.
OUR TIP: Read our article on how to tie a bow tie.
A dimple in the tie knot
A properly tied tie should have a dimple. These have been especially popular lately. You can easily tell whether the tie was tied by a person with experience or a complete layman/novice.
There aren’t many who have mastered this, which is why you see ties tied in this way more on TV with presenters and politicians than in everyday life. The knot is made in the last step of tying the tie, before the knot is tightened with your finger.
Simple, classic tie knot (Four-in-Hand)
Difficulty: low
Popularity: very high
The classic tie knot is considered the most popular and commonly used style of tie tying. Its simplicity makes it suitable for most ties and most shirt collars.
The knot has a triangular shape, which is rather elongated for thin ties and wider for thicker ties.
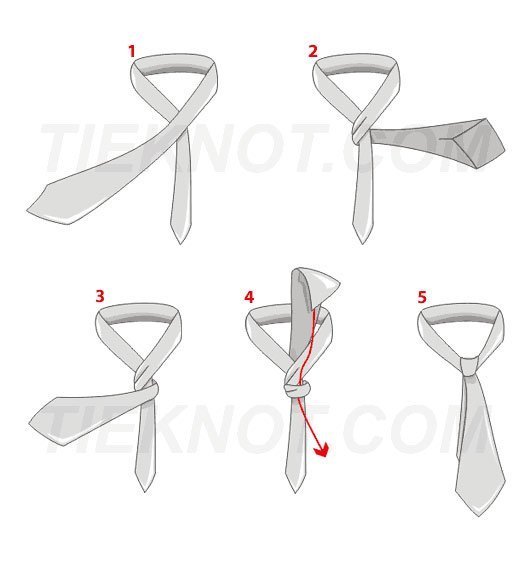
Windsor knot, full Windsor, double Windsor
Difficulty: medium
Popularity: high
Named after the Duke of the same name, the Windsor knot is a wide knot suited to wide shirt collars. The tying is more complicated than a classic knot. A perfectly tied knot must fit exactly between the two parts of the collar and must hide the last button of the shirt. It is suitable for tying from long and narrow ties.
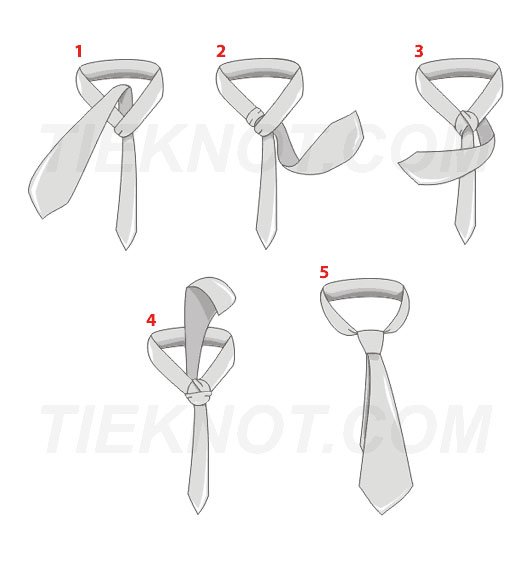
Half Windsor
Difficulty: medium
Popularity: medium
This is a simpler, and thinner version of the Windsor knot. It is suitable for thin and standard ties – it has a triangular shape, suitable for open or classic collar shirts.
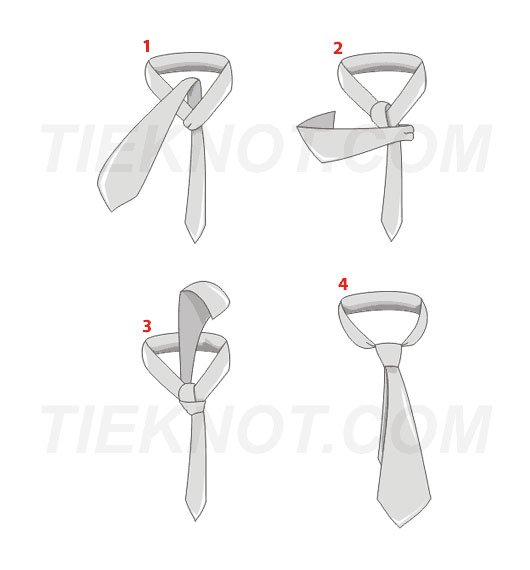
Small knot, oriental
Difficulty: easy
Popularity: low
The small knot is particularly suitable for wide ties and shirts with a pinched collar. It is definitely not recommended for long or open collar shirts.
Its design is quite simple, although it requires a 180° turn. The small knot is the simplest style of tie.
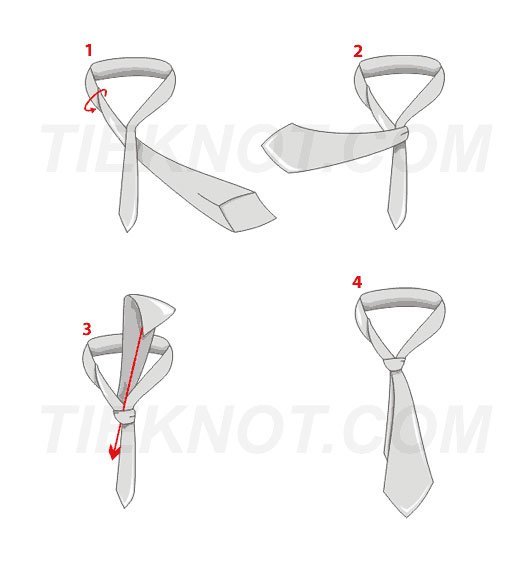
Double knot, Victoria, Prince Albert
Difficulty: easy
Popularity: medium
The double knot is very similar to the single knot, only one extra turn is added when tying it. This knot has a wider feel and is suitable for most shirts, even ties (except wide ties).
Double tie knot
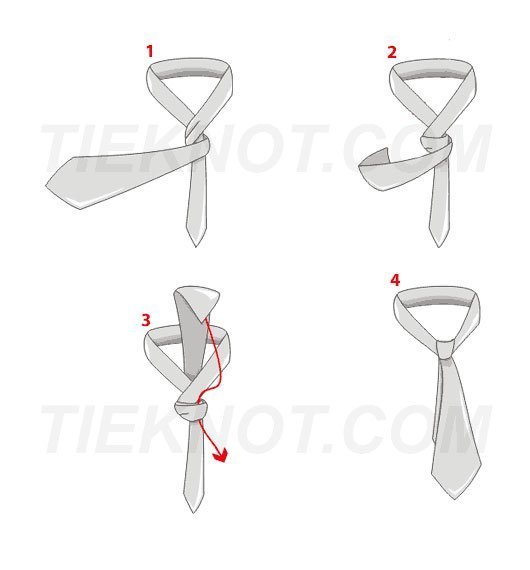
Book 188 tie knotting
Although it seems unbelievable, the book Les 188 façons de nouer sa cravate by French author Davide Mosconi actually describes 188 ways to tie a tie knot.
But you don’t have to worry about anything, it’s enough to learn how to tie two or three kinds of knots. One knot for shirts with narrow collars, another tie knot for wider Italian collars.
What about you, which knot or tie tying method do you prefer?

 Hi,
Hi,